Episode 14: Writing a Chrome Extension powered by App Engine
Welcome to Episode 14. In this episode we shall cover how you can get started with writing Google Chrome Extensions. We shall also drive the Extension via our App Engine application. We have already seen in earlier episodes how your App Engine applications participated within Google Wave, Google Talk, etc. So this episode takes it further and shows how you can write a Google Chrome Extension whose data will be provided by our App Engine Application.
Google Chrome Extension
Google Chrome browser since its release has got a fair amount of developer mind share. Recently they addressed extensibility of the Chrome browser by announcing support for writing your own extensions. So the focus is now on the developer to take this extension mechanism, harness it and produce some great extensions that extend the capabilities of the browser. You can read here the official announcement for Extension support over here.
Google Chrome Dev Channel version
Note: The first thing that you need to do is download a copy of the Chrome Browser from their Dev Channel because extensions are currently supported there till they come into the mainstream release. So given that, make sure that you download that version of Google Chrome browser.
The Beta channel or the Dev channel is available at : http://www.chromium.org/getting-involved/dev-channel.
Depending on your Operation System, download the appropriate version and install it. To check that you have extension enabled correctly, launch the Chrome Browser and click on the Settings icon as shown below. You should see the Extensions menu item available.

It is a good idea to take a look at the existing Chrome Extensions gallery that lists several excellent extensions that you can start using today inside of your Google Chrome browser. The gallery is available at Gallery : https://chrome.google.com/extensions. This page also contains a link where you can submit your extension too for the world to use!
See it in Action
Let us see our Google Chrome Extension that we shall build in this episode. The extension is a simple Reminder application. It shows the current Reminders that you have set up for the month. All the data is saved and managed by our App Engine application and the Chrome Extension simply requests and fetches the data for the current month.
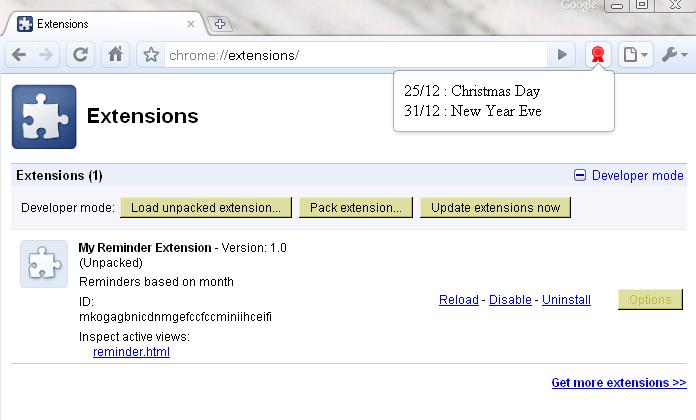
Shown below is the Chrome Browser screen with our Extension available as a little red icon in the Toolbar.

When we click the icon, it will fetch the reminders that I have setup in the current month (December) and display them as shown below:

Sounds good? We shall split up the details into two parts:
Part I : The first part will deal with developing/deploying our Server side application. This application will be deployed as a Google App Engine Java application. We shall keep the implementation simple and not do any database operations, etc. The focus is on the second part where we need to understand what it takes to get a simple Chrome Extension up and running, and which is powered by this Google App Engine application.
Part II: The second part will deal with how you can write a Google Chrome Extension. We will consider the bare minimum that you need to do to get your extension working. I will leave the design and look/feel aspects to you.
Alright then, let’s get started.
Developing our Java Web Application : MyReminderApp
The first thing to do is to create a New Google Web Application Project. Follow these steps:
1. Either click on File –> New –> Other or press Ctrl-N to create a new project. Select Google and then Web Application project. Alternately you could also click on the New Web Application Project Toolbar icon as part of the Google Eclipse plugin.
2. In the New Web Application Project dialog, deselect the Use Google Web Toolkit and give a name to your project. I have named mine MyReminderApp. I suggest you go with the same name so that things are consistent with the rest of the article.
3. Click on Finish. This will generate the project and also create a sample Servlet named MyReminderAppServlet for you. We shall be modifying this Servlet code appropriately.
Design discussion
Now that the project template is ready, let me discuss in brief what we shall be building:
1. A simple Reminder App that contains a list of Reminders. Each Reminder is kept simple and has 3 attributed only: The day, month and the description. For e.g. [25,12,Christmas Day], [19,12,My Birthday], [1,1,New Year Day], [31,7,Pay Taxes] and so on.
2. So we will define a Reminder.java class that simply has getter/setters for the 3 attributes : day, month and description
3. We will then write a ReminderService.java class (A Singleton) that implements two simple functions:
- ArrayList<Reminder> findRemindersByMonth(String month)
This method returns the reminders for a particular month. We pass in “1” and we get reminders defined for January, etc. - ArrayList<Reminder> findCurrentMonthReminders()
This method returns the reminders for the current month. The method determines which month is currently on and retrieves reminders for that month only. And this is precisely the method that will be invoked when our extension asks for the current reminders.
4. Finally, we shall modify the MyReminderAppServlet.java so that it implements a simple REST like interface for retrieving the reminders. If the request stream contains a parameter named month, then the reminders will be returned for that month by invoking the findRemindersByMonth method. If the request stream does not contain a parameter named month, then the current month reminders will be returned by invoking the findCurrentMonthReminders() method. The response will be returned in XML format.
Given next are the code listings, that should be straight forward to understand now:
Reminder.java
package com.reminderapp;

public class Reminder {

private String day;
private String month;
private String event;


public Reminder(String day, String month, String event) {
super();
this.day = day;
this.month = month;
this.event = event;
}
public String getDay() {
return day;
}
public void setDay(String day) {
this.day = day;
}
public String getMonth() {
return month;
}
public void setMonth(String month) {
this.month = month;
}
public String getEvent() {
return event;
}
public void setEvent(String event) {
this.event = event;
}
}
The Reminder class simply has 3 attributes : day , month and year. There are getter/setter for each of these attributes and a constructor that takes in all the 3 attributes. We are keeping at as String for now to keep things simple.
ReminderService.java
package com.reminderapp;

import java.util.ArrayList;
import java.util.Calendar;

public class ReminderService {

private static ReminderService _instance = null;

private ArrayList<Reminder> _reminderList = null;

private ReminderService() {
initializeData();
}

public static ReminderService getInstance() {
if (_instance == null) {
_instance = new ReminderService();
}
return _instance;
}

public ArrayList<Reminder> findRemindersByMonth(String month) {
ArrayList<Reminder> _results = new ArrayList<Reminder>();
for (Reminder reminder : _reminderList) {
if (reminder.getMonth().equals(month)) {
_results.add(reminder);
}
}
return _results;
}

public ArrayList<Reminder> findCurrentMonthReminders() {
ArrayList<Reminder> _results = new ArrayList<Reminder>();
String currentMonth = "" + (Calendar.getInstance().get(Calendar.MONTH)+1);
for (Reminder reminder : _reminderList) {
if (reminder.getMonth().equals(currentMonth)) {
_results.add(reminder);
}
}
return _results;
}

private void initializeData() {
_reminderList = new ArrayList<Reminder>();
Reminder R1 = new Reminder("1","1","New Year Day");
Reminder R2 = new Reminder("26","1","Republic Day");
Reminder R3 = new Reminder("15","8","Independence Day");
Reminder R4 = new Reminder("25","12","Christmas Day");
Reminder R5 = new Reminder("31","12","New Year Eve");

_reminderList.add(R1);
_reminderList.add(R2);
_reminderList.add(R3);
_reminderList.add(R4);
_reminderList.add(R5);

}

}
The ReminderService is a singleton class. And we are initializing some data here via the initializeData() call. We are not complicating things by using a database here but this is something that should ideally be there in a real application. As you can notice we add 5 sample records and for the current month i.e. December (12), we have two events. The two methods findRemindersByMonth and findCurrentMonthReminders are straightforward in which it goes through the reminderList and matches the records as appropriate.
MyReminderAppServlet.java
package com.reminderapp;

import java.io.IOException;
import java.util.ArrayList;

import javax.servlet.http.*;

@SuppressWarnings("serial")
public class MyReminderAppServlet extends HttpServlet {
public void doGet(HttpServletRequest req, HttpServletResponse resp)
throws IOException {
resp.setContentType("text/xml");
//resp.getWriter().println("Hello, world");

String month = (String)req.getParameter("month");
ArrayList<Reminder> _results = null;
if (month == null) {
_results = ReminderService.getInstance().findCurrentMonthReminders();
}
else {
_results = ReminderService.getInstance().findRemindersByMonth(month);
}

StringBuilder SB = new StringBuilder();
SB.append("<?xml version=\"1.0\"?>");
SB.append("<ReminderList>");
for (Reminder reminder : _results) {
SB.append("<Reminder>"+reminder.getDay()+"/"+reminder.getMonth()+" : " + reminder.getEvent()+"</Reminder>");
}
SB.append("</ReminderList>");
resp.getWriter().println(SB.toString());
}
}
Let us go through the code for the MyReminderAppServlet in brief:
1. It implements the doGet(…) method and inspects if a request parameter named month is passed or not.
2. If the month parameter is passed, its value is extracted and the findRemindersByMonth method is invoked. Else the findCurrentMonthReminders is invoked.
3. The result is then formatted into a simple XML structure and then it is returned back in the response stream.
Configuring the Servlet
We need to make sure that the entry for <servlet/> and <servlet-mapping/> in the web.xml file. is there for MyReminderAppServlet. This file is present in the WEB-INF folder of the project. The necessary fragment to be added to your web.xml file are shown below.
<servlet>
<servlet-name>MyReminderApp</servlet-name>
<servlet-class>com.reminderapp.MyReminderAppServlet</servlet-class>
</servlet>
<servlet-mapping>
<servlet-name>MyReminderApp</servlet-name>
<url-pattern>/myreminderapp</url-pattern>
</servlet-mapping>
Deploying the Application
To deploy the application, you will need to first create your Application ID. The Application Identifier can be created by logging in at http://appengine.google.com with your Google Account. You will see a list of application identifiers already registered under your account (or none if you are just getting started). To create a new Application, click on the Create Application button and provide the Application Identifier as requested. Please note this name down since you will be using it for deployment.
For e.g. I have registered an application identifier named itsareminder.
To deploy the application, follow these steps (they should be familiar to you now):
- Click on the Deploy Icon in the Toolbar.
- In the Deploy dialog, provide your Email and Password. Do not click on Deploy button yet.
- Click on the App Engine Project settings link. This will lead you to a dialog, where you need to enter your Application ID [For e.g. my Application Identifier itsareminder]
- Click on OK. You will be lead back to the previous screen, where you can click on theDeploy button. This will start deploying your application to the GAEJ cloud. You should see several messages in the Console window as the application is being deployed.
- Finally, you should see the message “Deployment completed successfully”.
Testing our Reminder Service
To test our Reminder Service, we can use the http://<AppId>.appspot.com/myreminderapp URL. You can replace it with your AppId and endpoint as appropriate to your application. For e.g. I have hosted it at http://itsareminder.appspot.com/myreminderapp and putting this in the browser returns me the Reminders that are set for the current Month i.e. Month of December. I get the following response XML:
<ReminderList><Reminder>25/12 : Christmas Day</Reminder><Reminder>31/12 : New Year Eve</Reminder></ReminderList>
Now that the development of the Reminder Service is complete, we can move on to the next part i.e. developing the Chrome Extension.
Developing the Reminder Service Chrome Extension
The official documentation on developing a Chrome Extension is quite good and you can refer it for more details. I will keep things to a minimum here and cover only what is required to get the Chrome Extension up and running. Follow these steps:
1. Create a folder on your machine. For e.g. I have created the following folder on my machine in C:\. It is c:\MyReminderExtension. All the necessary files that we create for the extension will reside in this folder.
2. To create an extension, we need at the minimum 3 files. The three files are an icon file for your extension. This icon will be visible in the toolbar as we saw earlier. The second file is a manifest file called manifest.json. The manifest provides important metadata about the extension like name,version, permissions, action, etc. And the final file is the html file in which you will keep the core of your extensions code written in Javascript.
3. So the first thing that I do is to create a manifest file for the extension. The manifest.json file for the Reminder Service is shown below:
{
"name": "My Reminder Extension",
"version": "1.0",
"description": "Reminders based on month",
"browser_action": {
"default_icon": "myreminder.png",
"popup": "reminder.html"
},
"permissions": [
"http://itsareminder.appspot.com/"
]
}
As you can see this is pretty simple. There is the standard name/version/description that you can give as per your preferences. The browser_action has two important attributes. The default_icon refers to the icon file that contains the icon for our extension. So this means that we will have the myreminder.png file present in the same folder. The popup attribute indicates which HTML file to be invoked when the icon is clicked. The permissions attribute indicates which domain the extension will be accessing to retrieve the data. In our case it is the http://itsareminder.appspot.com domain at which we hosted our application.
4. As shown above, we will create a file named myreminder.png in the same folder i.e. C:\MyReminderExtension.
5. Finally, we have the reminder.html file that will contain the code of the extension. It is listed below:
<style>
body {
min-width:200px;
overflow-x:hidden;
}

</style>

<script>
var req = new XMLHttpRequest();
req.open(
"GET",
"http://itsareminder.appspot.com/myreminderapp",
true);
req.onload = showReminders;
req.send(null);

function showReminders() {
var reminders = req.responseXML.getElementsByTagName("Reminder");

for (var i = 0, reminder; reminder = reminders[i]; i++) {
var reminderDIV = document.createElement("div");
reminderDIV.innerHTML = reminder.textContent;
document.body.appendChild(reminderDIV);
}
}

</script>
The code above is focussed around the <script> tag. It requires knowledge about AJAX and the XMLHttpRequest object along with some Javascript basics. The core pieces are mentioned below:
1. We use the XMLHttpRequest to make a call to our Reminder Service. The end point is where our servlet is present to serve the requests i.e. http://itsareminder.appspot.com/myreminderapp.
2. When we get the response XML, we call the showReminders() method. This method simply parses the <Reminder> tags and for each tag, it creates a <div> element in which the text content is the Reminder Event Text returned. Its appends each of the <div/> elements to the document.body as shown.
Simple isnt it? Now let us see how to install this extension into your Chrome browser to test it out.
Installing the Reminder Chrome Extension
At this point in time, I will assume that you have the following 3 files created in the C:\MyReminder folder:
- manifest.json
- myreminder.png
- reminder.html
You could have created different files but just remember that you need the icon, manifest and your html file that implements the Chrome extension code.
Once you have that, follow these steps:
1. Launch Google Chrome Browser. You need to go the Extensions page that allows you to view the current extensions installed and from where you can either install new extensions/reload/uninstall,etc. There are two ways to go to that page:
- In the address, type in chrome://extensions
- From the settings option as mentioned in the start of this article, click on the “Extensions” menu option.
2. You should see a screen that looks something like this:

What this means is that there are no extensions currently installed in my Chrome browser. If there were any, they would be listed over here.
3. Click on the Load unpacked extension button. This will bring up a dialog box from where you can navigate to the folder where your extension files are present. In our case, it was the C:\MyReminderExtension and so I navigate to that and click on OK as shown below:

4. This will install the Chrome Extension in the browser as shown below:

5. Finally, we can test out the browser by clicking on the icon and it will display the list of Reminders for the current month.

If you have newer versions, all you need to do is simply click on Reload option for the extension. Alternately, you can also Uninstall and load it again.
Some points to note:
1. You have not completely installed this extension. What this means is that if you close the Chrome Browser and launch it again, this Extension will not be visible.
2. The next step would be to visit the official documentation at http://code.google.com/chrome/extensions/getstarted.html and also go to the gallery and submit your Extension. The gallery is present at : https://chrome.google.com/extensions and you will find a link to submit your extension. Click that and follow the steps to submit your extension. All you will need to provide from your side will be a ZIP file of the folder that we mentioned above.
Conclusion
This concludes the final episode of the year 2009. In this episode we covered how to write a Google Chrome Extension and power it via a Google App Engine application.
I hope that the new year takes you further into writing Cloud applications using Google App Engine. I will continue to explore tools/languages/APIs/extensions that work in coherence with the Google App Engine. The journey or might I say “Experiments” are far from over. Have a great 2010 and thanks for reading this blog. Its been a joy to share my experiments with all of you.


Well done Romin,
Another great article.
Happy 2010 to you and to yours.
Keep producing jewels like this.
Jérôme
Thanks Romin for such an wonderful article. It really helped me and here I am ready with 2 Chrome Extensions deployed on Google Chrome Extension Gallery:
To know more on visit my blog:
1. Cricket Score (http://ppandhi.wordpress.com/2010/01/04/cricket-score-chrome-extension/)
2. Todays Special (http://ppandhi.wordpress.com/2010/01/03/todays-special-google-chrome-extension/)
You can ditrctly download the extensions from
1. Todays Special: https://chrome.google.com/extensions/detail/mpmnpogpambbdefehmeoomdilopljfgj
2. Cricket Score: https://chrome.google.com/extensions/detail/hjbkofaklbdedbplipaikfcbnbnocpob
Thanks for the nice Article, found it really simple and helpful. Well, actually I’m a beginner in Google chrome extensions development, and was wondering if these extensions will support integration with other application (like Java); this article gives a good explanation and answer to this wondering, but my question is that, this article is written in the late 2009, does 2010 held a really significant changes to developing such extensions, and is it possible to develop a new extension without switching to the developing Chanel ?
thanks a lot in advance, please use the email I provided as your reference in case u’d like to contact me, highly appreciate your interest in answering me.
Thanks again.
Thanks for the positive comments. I believe the process should nearly be the same but I have not written an extension for quite some time now. It should not take much to validate if the process in the latest build of Chrome.
Thanks
Romin